Friday, December 20, 2013

Every Day Carry (EDC)

I had the joy of spending my early years of life on various ranches and farms in South Dakota and Minnesota. Part of growing up was getting your first pocket knife, a monumental day that I can still remember and still have the knife. Everyone carried a knife, it was the most essential tool you could have (days before multi-tools). Folding knives were the standard and still are for the most part due to ease of use and ability to disappear when Sunday suits were worn. Then a few years back a friend and loyal KoM supporter gave me a magnificent little fixed blade knife made by Barry Dawson called an EDC. About 7.5" overall 3" blade and slim enough to fit in the leg pocket of Carhartts. All the benefits of a fixed blade yet small enough to disappear. I've skinned moose, goats, and bears with that little knife and done millions of chores with it. So this is my attempt at making a similar concept of a light, strong, small knife that you can tote along all day and not get in the way or make a big show.
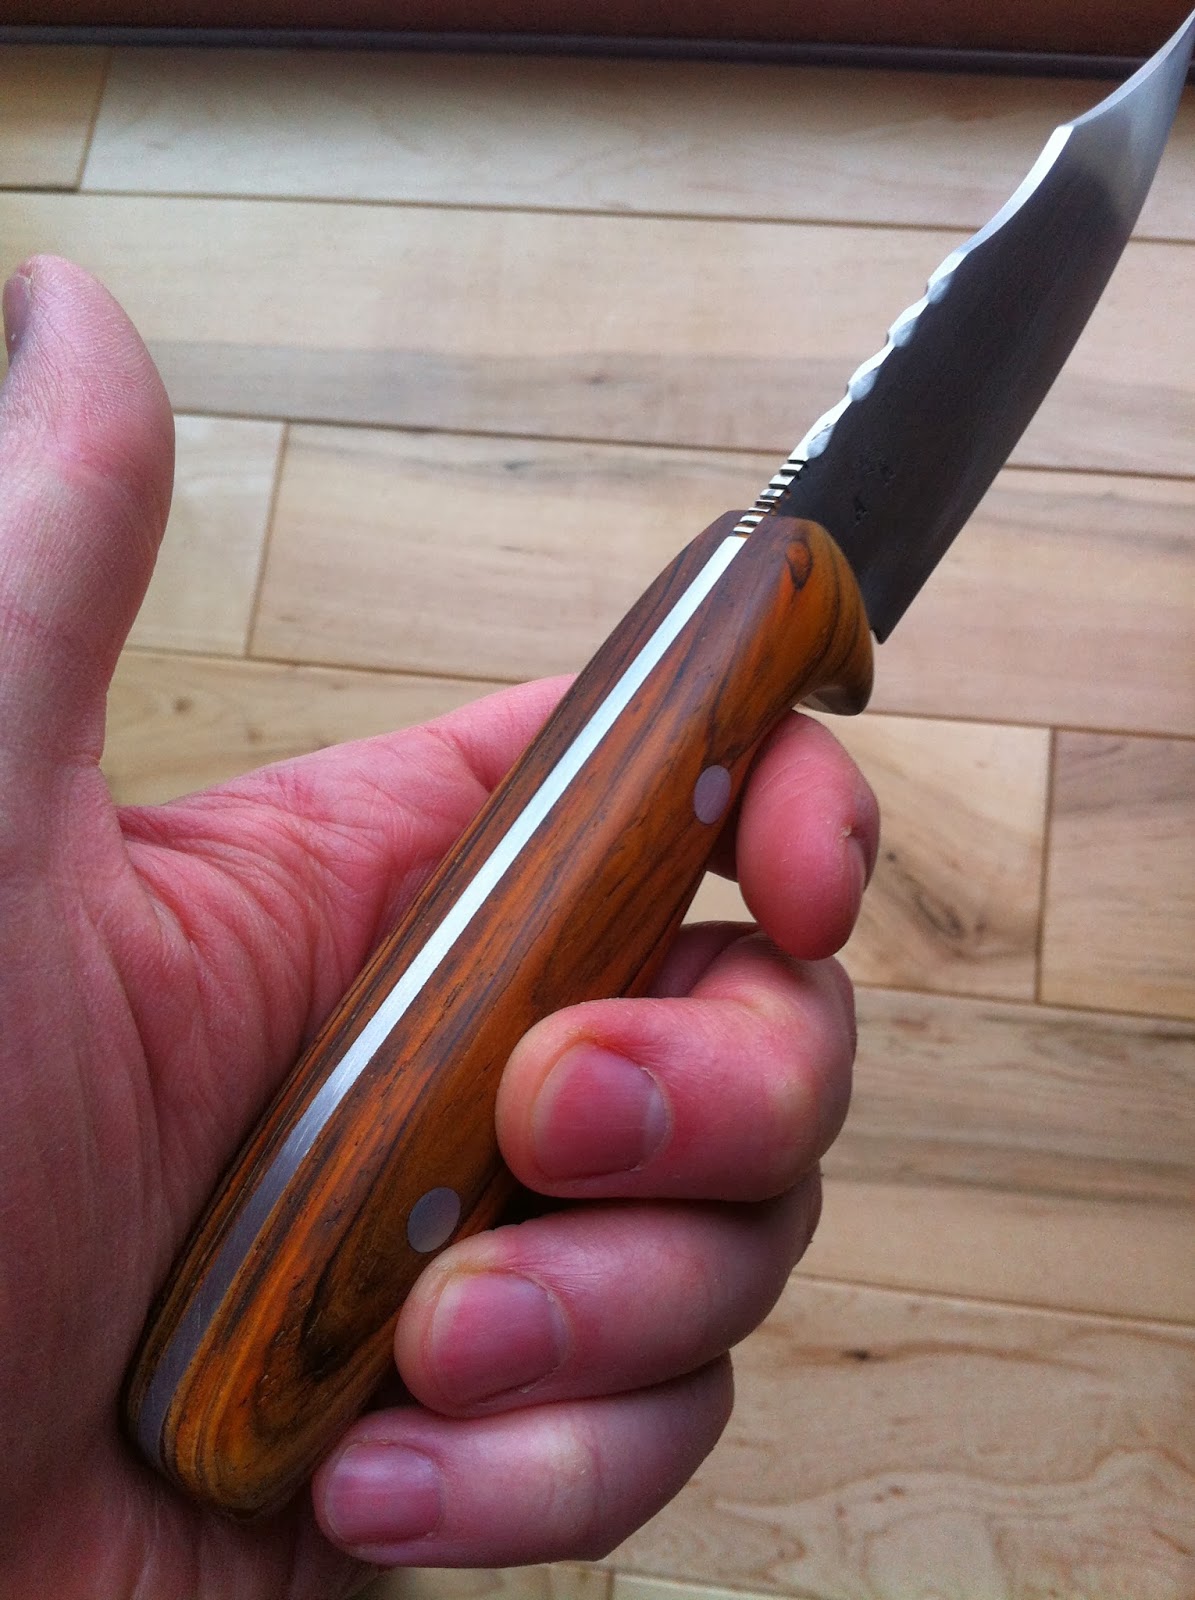
Nearly finished knife with hamon line clearly visible. G10 micarta handles and brass pins.

I started with 1/8" thick 1095 HC steel but instead of standard heat treatment, used the Japanese method of differential heat treating and clay tempering to increase the flexibility of the thin blade while maintaining a wear resistant edge. I used the same method on my "Dakota" model but took more time etching and polishing to produce a stronger hamon (different color on the blade produced when the steel cools at two different rates simultaneously.

I use high temp refractory cement as a clay coating material. Someday
I'll develop my own family secret recipe as they do in Japan.
These blades have just been heat treated and quenched in oil. 1095 becomes non magnetic at its critical temperature (@1450 f) and then plunged into warm oil. Here you can see the hamon line where the clay covered the blade (darker) and slowed the cooling process. The blades are then tempered to relieve the stress of rapid cooling and produce the correct Rc hardness.
I temper all my blades two times at two hours each round with a cool down in between.
These blades are only hard on the bottom third toward the cutting edge.


Leather work and a fine 12 year old blended
refreshment.
Leather work ready for stain and stitching
for the trio.


The finished set of knives with black leather sheaths and high contrast stitching. The finished knife is about 7.5" long with a 3.5" cutting edge. The handles are G10 micarta with a slight red and black contrast and unseen in this image the handles have bright red fibre spacers between the blade and handle and brass pins. I hand finished these blades to 400 grit and etched them pretty heavily as they are working knives that should be used daily. Traditional Japanese blades with a hamon are sanded to 1000 grit and polished to a mirror finish. That's a lot of time and sanding which equates to a much higher cost with no performance gain. I'd rather have someone spend $150 on this custom knife and not feel guilty about scratching it rather than spend $1500 on a knife that never gets used. But if you want to spend $1500, I wouldn't turn it down.


Monday, December 16, 2013

Pride

Two types of knives are produced in my little shop, things I dream up and figure out how to sell later and bespoke items that I work with clients (always referrals) to make happen. All my products are handmade by me, Malta. They start life as an idea sketched out and end up as a functional tool. This one was quite a challenge and almost didn't. But, when finally finished, it struck me,  I was proud of this simple tool. Life is like that sometimes, you want to give up but keep at it and in the end it all works out. I hope the new owner enjoys his Christmas present as much as I had making it.


Finished with time to spare. If you know cabinets, you'll recognize the backdrop.


 Roughed out with grind lines marked
Rough grind. The top knife is for a retired operator, the bottom
is for a Vietnam Vet.


Cleaned up after tempering


Fresh out of heat treatment and oil quenched in my shop


Handle blocks, Cocobolo for this one and canvas micarta for the
other knife, both with .25" stainless pins


Handle roughed out on the band saw


Handle fitted, file work on the spine with
thumb rest


All my knives get custom made sheaths that are produced in house (either kydex or leather). This one is 8oz vegetable tanned cowhide from a local supplier in Anchorage. My leather comes in big odd shaped sheets and ends up like this. Some knife makers don't provide sheaths for fixed blade knives and I think that sets the wrong tone of "I don't expect you to use this pretty knife." Not here, these are not museum pieces but affordable field grade knives. The sheaths are cut, wet fit, and finished.   
Saddle stitching and contact cement hold these together.
Almost done, just need wax and polish.

Final specs on this one. 1095 HC steel, 9.5" overall, 4.5" cutting edge, Cocobolo handle, stainless pins, leather sheath. I hope he likes it as much as I do, this one just fits right in the hand and is scary sharp already but could be honed even more. Thanks to Broken Tooth Brewing for tasty beer, I'm not sponsored but from one craftsman to another, well done! Now to get the other four on my bench out the door so I can start experimenting with hatchet making.


Friday, October 25, 2013

Making "Dakota"

I originally hale from South Dakota, and so do the last 8 generations of my family. My family is all still there along with many good friends. Every time I go home for a visit it takes me a couple days to get used to how nice people are and the sense of community that exists in their actions. A month ago a huge unseasonal storm hit and devastated the ranchers that eek out that tough living on the plains. One ranch that got hit hard is owned by a man I do a bit of business with and also share some mutual friends. In typical Dakota fashion he asked for a simple favor, he needed to know how much business he could count on before buying some needed equipment. No, not donations, or handouts, he asked for more work. That says a lot about the character of man and reminds me of my grandparents that survived those lean years of the dust bowl.

My idea was to give Jay of V Lazy J Custom Leather more work to do (he asked for it) by making him a knife and he could make the sheath and auction the rig off to raise some funds for his herd. I don't make tactical knives as that's not my world but wanted to give it a try with a heavy piece of 1075 I had in the shop. I had the supplies and just had to throw the effort in to get this rolling.

My inspiration was the Tom Brown Tracker, but with some modifications and personal preferences. Here is my initial sketch up pad where all my ideas start out. you can see the erased lines where I changed the design around. I then make a paper template and transfer it to the steel.  This piece of steel is 1075 HC that is 1/4" thick and 2" tall.


Here is the blank after it is flattened, cut out and cleaned up. I start with a portable bandsaw for the rough outline, then a big bench grinder to shape it more. I finish with a couple different belt and drum sanders to finalize the shape.


On the left you can see the outline for the grind lines and the finished product on the right. Again grinder, belt sander, then files and sand paper to get the grind bevel correct. 


 This beast was first normalized in my kiln to reduce the stress of grinding and shaping the steel. Then it got a light coat of clay to keep the de carbing in check and then a heavier layer. This is Japanese style differential heat treating. It allows the steel to cool at two different rates simultaneously. So the edge is hardened but the spine remains slightly softer to allow for some flexing and reduce the chance of a complete failure under stress.


Specs: 9.75" Long 4.5" cutting edge, 2" tall at the widest, 1/4" thick and weighs 13.2 oz
 I added some heavy texture to the micarta handles to aid in grip and three tubes to allow the owner to place a lanyard where needed. As this knife is a heavy work grade tool (matte etched finish) I wanted to make sure it worked before leaving the shop. My test was this, it had to shave then chop a 2x4 completely in half across the grain and still shave. Yup, it passed and I have the bald spot to prove it.

Here it is all cleaned up and ready to ship to South Dakota. Now for my selfish part, I haven't seen Jay make a sheath yet so now he has to and then I can bug him to make my clients really cool matching rigs.

Lacking much creativity this week I dubbed it the "Dakota". Not fancy but tough as nails and designed to get the job done with no excuses. Yup sounds about right. I might make a lighter version this spring if there is interest....

This will be up for auction through V Lazy J Custom--find them on Facebook.  Great leather work and world class customer service! He even makes old school rigs for wheel gunners like me.

Tuesday, October 22, 2013

Handmade Bench Chisels

I enjoy dabbling in wood working because this allows me to justify owning more tools and making a mess. The essential tool of any woodworker has to be chisels. Which seems odd as many youngsters don't know how to use them and have never owned one of any quality. Most commercial chisels sold today are garbage, a waste of precious resources. I wanted a fine set for my shop but realized I couldn't afford to buy a hand crafted set. So why not make one? I decided on bench chisels with a 6" blade with a 5" handle, 01 tool steel from New Jersey Steel Baron and basic sizes of 1/4", 1/2", 3/4", 1" and 2" (this one is 1075). As with most things in life I don't let a lack of knowledge stop my endeavors, learn by trying. Everything but making the dowels was done in my shop including heat treating of the steel.
Basic shapes cut out of bar stock 2" is .25" thick
the rest are .187"
Rough profiles ground and tangs rounded


The handles caused me a lot of grief in the planning phase as I don't own a lathe. My solution was to go with Japanese style handles with copper ferrules. Bell Forest Products sells exotic hardwood dowels, so round wasn't an issue. I cut them to the length I needed then made a jig for my drill press. This is easy by drilling a hole in a 2x4 scrap and then cutting it in half with a pull saw. The kerf allows me to clamp the dowel on my drill press and make a hole for the tang.
How to make a ferrule? I looked high and low and could only find one offering from Lee Valley Tools, but the shipping was outrageous to Alaska (as usual) so plan b. I discovered that 1/2" copper pipe caps have exactly 5/8" opening which is a size of plug cutter I own already. Used my dowel jig again and the plug cutter to form the piece that will fit inside the ferrule.

Excess wood removed and ferrules fit


I removed the excess wood on the bandsaw by setting the fence up and rolling them trough the cut. I used a belt sander and some steady hands to shape the bottom of the handle into a slight taper down to the ferrule and also round the top off. The handles are affixed with epoxy, sanded to 400 grit and then given two coats of boiled linseed oil and a top coating of wax.
 
The pattern on the blades was from the clay coating placed on the steel for heat treating to keep the steel from de-carbing. I liked it so didn't clean them up except for the cutting edges that are polished.
 
As with any first time project I learned a lot and this won't be the last set I ever make. Now I have my own set of  pretty chisels! 

Friday, October 11, 2013

Gentlemanly Pursuits

This is part one of an idea I started a year ago and am just wrapping up part one. I enjoy outdoor pursuits of almost every kind and like most outdoors people I long for those days when hunting required tweed vests and fishing was done with bamboo flyrods. It seemed each item was crafted by an expert and it was just as much fun to maintain your gear as it was to use it. Oh, yes I'm nostalgic for a time I never lived, the days of WDM Bell and Jim Corbett. Which brings me to the idea of a gentlemen's combination for the field; a matched set of bird and trout knives and tobacco pipes. I've always enjoyed upland bird hunting, it is a great way to spend a day. You can talk while working a field and catch up with friends while pursuing game over a fine hound. It's not about tromping mountains or carrying giant packs through swamps, its a relaxing pursuit and the tools should reflect this effort. They should be crafted to the task and be of the finest quality.
The shorter three are the bird and trout knives. 3/16" 01 tool steel, all being fit with brass bolsters and choice wood. The longer blade is for a Major sorting out some nefarious fellows abroad.

Etched blades and olive wood handles
Fitting and roughing out handle blocks


Wet fit 8oz leather belt sheaths


I did everything on these knives in house. I cut and ground the blades by hand, heat treated in my kiln. The olive wood was cut from larger block and hand fit and finished to each knife. The sheaths were made from a piece of vegetable tanned leather, just a big piece of cowhide. In these days when many "custom" gun and knife makers are nothing more than assembly men for factory made parts I think it is important to be truthful of who makes what. These are all mine, even the minor flaws that no one but me will ever see.

Now it is on to making the matching pipes to complete these sets. It just so happens my oldest friend ordered this set, now we just have to make time to pursue birds together again.  

Finished, 6 coats of tung oil on the handles to build up depth and a wax finish over the top. Double etched blades to create a pattern on the steel. 8.5" overall with a  3.5" cutting edge. The leather is finished in oil and wax as well. I despise tools that are hard to maintain, a little regular maintenance will keep this set going for a couple generations.

Tuesday, May 21, 2013

Testing

I have a few fail safe testing measures in the shop for any new knife (RC testing, cutting, edge testing, NEVER use as a pry bar test) but then I need field testing. I'm only one man, who usually works in an office, so I seek qualified testers from time to time. As luck would have it my friends (and friends of friends) contain some very qualified testers (Marines, Operators, PJ's, Sappers, CSAR) and other professional grade testers. I figure if you get paid very little for volunteering to dangerous work it should come with the occasion perk. Knives of Malta likes to offer that perk.

As someone who spends many days in the back country of Alaska hunting, and exploring I have a great admiration for the Air National Guard Combat Search and Rescue Units stationed here in Anchorage. Their motto is "So that others may live". I have made a few knives for various members of the unit and used their feedback to create this knife.
1095 HC, etched 4" blade 8.5" overall, G10 Micarta handles with aluminum tubing

 I wanted to keep the knife strong, light and with a slim profile. You can see in the picture at the right the handle is only .5" thick with most of that being hardened steel. I made the pins myself out of aluminum with .25" holes for lashing. This kept the weight down and blade forward balance. Large finger and thumb grooves were added to stop forward motion of the hand.


Bushcraft Alaskan in O1, cord wrap handle, thumb serrations, etched blade. 9" overall 4.5" blade.

Tuesday, March 26, 2013

The joy of quiet tools


My first draw knife 3" cutting edge 1095HC, great for carving and shaping.

A young man received a cordless screwdriver for his birthday and was so excited he had to call his dad and brag.
“Dad my wife bought me a cordless screwdriver for my birthday. Isn’t that great!”
“That’s great, but all my screwdrivers are cordless son.”

I’ve been a begrudging convert to the wonderful world of hand tools, those magnificent items that don’t run out of power unless you get tired of working. Like most people hand tools frustrated me to no end. This is a result of two common reasons: 1. I had poor quality tools 2. I lacked the knowledge of how to maintain and use those tools.

Power tools are easy, you can use a mitre saw or drill press without knowledge of electronic engineering or how wood grain affectsthe cut. The difference between an orbital sander and a handplane is that one requires practice and knowledge to use effectively. Practice at using a tool? That is an absurd notion. Quality hand tools can cost triple their powered counterparts, so why bother? Ahhh, the experience! The satisfaction of knowing your tools, their strengths and weaknesses and how to get the most out each one. I noticed with power tools, the danger is immense: eye, ear, respiratory protection is constantly required. Smooth a board with a belt sander and you’ll be cleaning the shop for week, use a plane and you can listen to Howlin’ Wolf at low volume and clean up is a few minutes of sweeping. The gentle swoosh of sharp plane iron is a welcome change from the terrible whine of belt driven machines.

To create something, is to understand it.


My first hand tools were made on a whim. I thought draw knives were just neat looking, so I made one. It has taken me hours of practicing to read wood grain and control my depth of cuts, but now it is much faster at finesse shaping than a sander or saw.

Kiridashi in 1095HC 60rc paracord wrap

Next was my first Kiridashi, a very simple Japanese utility knife. I had a few inches of left over steel from a project and so it came to be. It sat on my bench unused for some time, until I had to cut leather for a sheath, my fancy utility knife was botching the job so out came the tiny simply knife. BAM! It cut far better than a razor, making my life safer and easier.  

My next journey is to make my own chisels as they are the heart of any shop. I still love my bandsaw, but realize that sometimes things are much easier if it stays quiet.

Monday, March 11, 2013

Nostalgia

Ah, breakup is finally in the air in South Central, Alaska despite a snow storm all weekend long. The past two weeks have found me in the shop but working on my house and not on knives. I finally got some time in the shop late last night and became a bit nostalgic when I came across these images from the past summer. The knife was made based on some equally historic pedigrees. The handle is a ode to Scagel Knives who made the leather and antler handles famous during the first half of the twentieth century and continue to draw investors today. The blade is Scandinavian inspired with the grind but I added a secondary bevel, a sharper point and some file work versus a standard Puukko design. The overall design is a to be a tool and not a weapon, with the cutting to be done in drawing motion and not a stabbing or pushing motion. 

The knife was made for someone who did something remarkable, they vouched for me. To me this was a very generous act and one that seemed a bit out of place today. I have come across many people who say they will help you out, or do something for you, only to find out that their word isn't all that valuable. So when someone staked their hard won reputation on me, it meant alot. Saying I trust you is one thing, to trust someone else with your reputation is another. At least that is what I was raised to believe and will continue to pursue in my lifetime. Maybe its just glorified "golden age" thinking, but reputations used to make people honorable and trust worthy, not contracts written by hired gun attorneys. So this was my small way to honor that, a nostalgic knife for a nostalgic act. 

Knife Specs:
Blade: 4" 1095 HC RC 58-60  (8.25" AOL)
Handle: Black tail antler, nickel spacers and leather washers
Sheath: 7oz leather (pouch style)

I just wanted to post a photo of my backyard in the summer. View from Flattop just behind Anchorage, It won't be to long now.


Thursday, February 21, 2013

This is getting serious


Every Day Carry design in 01 steel with micarta handles with my favorite carry load a 125gr JHP .357mag.
  
Same design in 01 with Bocote (back) and Wenge handles and mosaic pins.
Sheath are kydex wrapped in leather.


Wow, it has been a crazy year since Knives of Malta created its first truly custom knife. It was a very rough Warncliffe design heat treated in a homemade forge. Since that knife I have created dozens of blades and continue to get better with each one. This has only been possible from the amazing support of my friends and family. Thank You.

A certain unnamed individual that finds themselves in harm’s way quite often has really pushed the idea of Knives of Malta since I cranked out the first blade a year ago. Now I’m getting contacted by individuals that have access to any equipment they desire, and would like to add one of my creations to their kit. Wow, things are getting serious. As a result all of my knives will now be heat treated in a scientific kiln in the shop and each series will be tested to ensure proper Rc hardness is achieved. Up to this point my heat treating has been rudimentary but very successful with high carbon low alloy steels, this will also allow me to expand the steel types utilized. This also allows for larger knives to be created and uniformly heat treated. My inaugural run will be a slightly larger set of the Bushcraft Alaskan in 01 steel.

Knives of Malta will also be introducing our first set of handmade bench chisels and drawknives this year for those discerning woodworkers that believe tools should be something your grandkids fight over. The more I use hand tools in wood working, the more I’m addicted to them. Try it, they are exceedingly quiet to use.
My handplane collection keeps getting bigger.

Monday, February 4, 2013

A need unmet


8" Cleaver in 1095 HC etched blade, because I can.

It's always about the money, except when its not. As an ardent capitalist and business student this is an equation I struggle with constantly. As an American the bottom line is always on my mind, especially with my precious free time. But my equation into the value of tool making was broken, I was only looking at ones and zeros, red and black. The most important piece of the equation was missing until just recently.

My friend was relating an ambitious project he has in the works and stated, "It's not about if I want to make this happen, I have to make this happen." This project of his is so important that he has to get it out into the world and make it work. It isn't just a balance sheet, it is much more than that. How often do we approach an idea this way? That we feel it is up to us to turn concept into reality and not for economic value but for our own experience. If profit is the result, so be it, but the success or failure is not in the money, it's in the experience of creating.

This resonated deeply with me and I knew the minute he said it, it was what I had been failing to account for. Currently making tools is something I have to do. Could I simply buy equivalent tools? Yes, but you can't purchase the experience of honing your own skill and increasing your knowledge through hard work. To awake in the middle of the night with an idea that needs to be produced and following through from blank page to useful implement is a value far beyond a few dollars.

Turning theory into reality is what separates arm chair cowboys from bronc busters. It's not always about the money, sometimes it's just to know you can.

Destructive testing a KoM cleaver with a 4" blade in 1095 steel, so far it has resisted destruction.  


Monday, January 14, 2013

Bar stock to Blade part 3 of 3


Rough shaped handle scales dry fitted
In the last segment I covered grinding and heat treating of the blades, now we need handles, sheaths and a final edge. Not a lot of photos from these steps as I was rushing to meet my deadline and didn’t stop to take a lot of pictures. After heat treating the blades I clean them up starting at 220 grit and working up to 1000 grit. This is a tedious process and if you rush it, it shows. Once the blades were up to 1000 grit polish, they get a buffing on a sisal wheel with #2 polishing grit. I’m not going for mirror finish but wanted some shine.

Glue up of handles with epoxy
For handle material I chose G10 Canvas Micarta in Green/Black layers that produce a camo style pattern when the handles are shaped. Handle design are traced on the micarta, then tape the handle scales together with double sided tape and rough them out on the bandsaw. Then clean them up on the belt sander. Drill the holes for pins once this is complete and attach them to the blades using epoxy and ¼” stainless pins. Let the epoxy cure for at least 36 hours. Since these are going to be abused and used, the handle isn’t going to be pretty in the classical sense. The goal was to ensure a positive grip, even with cold wet hands or gloves. I like highly polished wood and bone handles, but not when I’m quartering a moose in the dark and it’s snowing.


The knife with the recurved tip is going to a war zone, and however unlikely it will be used in close quarters combat, it had to be considered. This is where the heavy choital and thumbrest come into play along with an aggressive grip.

Kydex initial sheath molding


Per customer request, the sheath was to be Kydex with a large molle lock. I used heavy .09” kydex and molded it in the press. Gunmetal eyelets secure the sheath together and allow the molle lock screws to act as tension control. A heat gun is used for final molding and making a thumb break that you push against to draw out the knife. The molle lock allows the sheath to be orientated any direction on a belt or molle type harness.


Finally I grind an initial edge on a slow speed wet stone, then hone it using a paper wheel and polishing compound. This one will shave a bit, but didn’t take it to razor edge as it would be hard to maintain in the field like that.
Final product with kydex sheath, on its way to war right now.