Sunday, December 30, 2012

Three Finger Skinner

When I first moved to Alaska at the turn of the century I thought that bigger knives were better. I mean just look at the size of a moose, you must need a machete. Wrong, I find large knives to be cumbersome, heavy, and mostly unnecessary. Especially when it comes to skinning out game. Really for moose I prefer two knives and a saw. I carry a shorter knife for gutting/skinning (like the one below) and then a large butcher knife around 9" with some flex to the blade.

I have personally dispatched four moose and butchered nine including a 62" and 54" Yukon monster. So this isn't advice from an armchair cowboy. I've also have a room full of rugs that attest to my skinning of big game. Now, if you have a different method than mine, great, this is my opinion and nothing more.

Three finger skinner, sole authorship from Knives of Malta

I prefer short blade skinning knives with a really deep belly. I've used Outdoor Edge T-handle skinners for years with great success. But, like any hunter I always need a new knife or try a new idea. This is my first attempt at what I think is an ideal skinning knife. The handle is based on a three finger grip with the index finger resting on the top of the blade. I find this works well as it adds control and if you are going to cut accurately, just point your finger and the blade follows. I prefer the deep belly of this blade because that is were I do 90% of my skinning, with the straight section for general cutting/butchery.

Knife Specifications
Blade Length       3.5"
Overall Length    7.5"
Steel           1095  5/32" thick
Hardness            HRC 59-61
Handle               Wenge
Pins                    Nickel


I made a little kydex sheath with a standard MOLLE lock that will fit over belts or packs, etc. The blade grind is a sabre grind with a secondary bevel and it'll shave. I haven't used Wenge before so I'm interested to see how well it does in Alaska's saturated hunting grounds. This one isn't in my possession so I can't give a final report and am awaiting the owner to get it messy.

Sunday, December 23, 2012

You'll Shoot Your Eye Out!

Ah the Christmas classic never gets old. If you have never wanted a Red Ryder BB gun for Christmas then I feel sorry for you. This was a right of passage for every kid I grew up with, but then again so was your first chainsaw. Which my brother promptly used to cut down a Christmas tree on top of me, ah youth! My goddaughters already have their first Red Ryder and dad has been teaching them to shoot, but unfortunately the stock is a bit long for them. So when I heard they were having trouble shooting I felt it was godfather duty to remedy that. I simply could cut down a stock Red Ryder but what fun is that? Nope, this was going to be a one off worthy of the little girls learning to shoot.


 I had a nice piece of walnut in the shop that was about the correct width. I traced the stock onto the walnut and cut it out on the bandsaw and rounded it over on the router. Unfortunately it was just a bit thin, so I had to mill some 1/16" shims to blend in and fill the gaps. In the upper right you can see the rough shims being fit. The picture to the right shows the shims blended into the stock and fit.

For the the forearm I had to laminate the walnut to get the width built up. Here is the original and the laminate walnut, the grain was really tight so the seem just melted away. In hindsight I should have milled the inside channel before this, but as I've never made a gun stock I didn't know this. It worked but I found out why the router is dangerous when trying to  channel. Chisels are much safer and it ended up being a near perfect fit after a few hours of learning the hard way.
Dry fit test before final polish with 400 grit and lots of poly to build up a durable finish. 


Finished custom built Red Ryder! I used a wipe on Poly to build up a high gloss finish. First coat, then 400 grit, then using steel wool between the next six coats to really bring out the figure. Not the mostly highly figured piece of walnut I've found but a nice upgrade from the factory stock. This one is 1.75" shorter in the length of pull which should make practice much easier for them. Hey, if they want to come hunt with the godfather, they better be ready. I'd settle for just a canoe trip with them.

Tuesday, December 4, 2012

Handmade Sgain Dubh

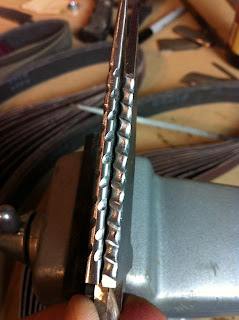
File worked spine starting to take shape.
 Knives that carry a history with them are my favorite type of blade and one would be hard pressed to find a better history than the Sgain Dubh from Scotland. My limited research and knowledge is that these knives translate to "black knife" and were worn inside the knee socks of highlanders. The "black" signified the dark handles that just poked out of the sock and blended in with the dark wool. This allowed a highlander to remain armed while being cordial and leaving his longer edged weapons from social gatherings.

Sgain Dubhs had a resurgence in the mid 19th century Victorian era when they became fashionable and quickly went from useful to ornate. I wanted to make a pair of Sgain Dubhs that stayed true to the original purpose of a deadly last ditch knife but look handsome as life is to short to own ugly knives.


Both blades file worked
Duality, one piece of steel, one piece of wood. 2 knives.


Heat Treating in forge
 I had just enough 1095 steel for one big knife or two small knives, so I decided to double my work load and make two matching Sgain Dubhs out of the same piece of steel. They bear different file patterns on the spine to distinguish them apart. Both were made from stock removal process and then triple heat treated in my mini forge and hot oil quenched to ensure proper strength. 


Heat treated, fitting blocks for handles
Blades polished, handles roughed out


 After triple heat treating and oil quench the blades are double tempered at 400 degrees F for 2 hours at a time, resulting in a Rockwell Hardness near 60. These aren't every day use knives, but need a hard edge when called upon. I polished the blades to 1000 grit and then fit the Honduran Rosewood handles and nickel guards to each blade. These handles are extremely difficult to makes and keep symmetrical. After completing them I had a wee dram to celebrate.

These little knives were much more difficult than I thought and doubt I'll turn them into a regular production item as they are mainly for show and not much usage. I prefer to make knives that take a daily beating. But, true to form they are gorgeous and I will have a hard time parting with them as they were spoken for before they left the drawing table.

Finally I made simple heavy leather blade guards for each knife so that you can place the whole thing in your sock with only the top of the handle sticking out. Just grab the handle and the guard stays in place when you draw it out. Not the easiest thing to re-sheath but last ditch weapons are more about surprise than putting away. They will both shave if ever called upon to do so.