Monday, July 28, 2014
Hiatus
Right now my workshop is collecting dust, but not in the industrious way it normally does. I have not spent an hour at my workbench since February. After a lifetime of thinking about it, I joined the military in my mid thirties. After three years of patience and persistence I was offered a position with Air Force Combat Search and Rescue based out of my home in Alaska. This demands all my time and attention to be successful. I will return to knife making when time allows but for now I'm honing myself to be a member of this elite group.
Monday, February 10, 2014
Fancy Dakota, orderd by a brother built by a friend.
 |
| Finished Dakota Lite, etched, oiled and ready for war. |
An old friend said his brother was heading to Afghanistan and wanted a nice knife to send him over with. Being a support unit it is less likely that they will see combat so I wanted to make a show piece that is still deadly if the need arose. I chose my previous Dakota model that I made for V Lazy J leather, as I'm very fond of it. As you rarely see a belt knifes blade, the leather and handle need to stand out to show off a bit. I don't own a $250k shotgun, but know one when I see it and wanted to give this soldier a bit of a show piece.
The original Dakota was .25" thick and very heavy the Lite model is 5/32" to drop a bit a of weight and make the balance more centered.

It is a rather large handle at almost 5" long with a deep finger guard. I chose birdseye maple and brass pins for the handle with a red fibre spacer along the spine. To really make this stand out I went to a technique of tobacco pipe making and used a stain to make the grain really pop.


 Sheath was made in house out of vegetable tanned 8oz leather. Because of the gloss finish on the handle the snap has a leather cover under it so the finish won't be marred. The leather is waxed to improve water resistance and give it that soft feel that good footwear should have.
 I'm not comparing my work to fine British craftsmen like those at H&H, but they definitely inspire the work I do.
Ordered by a brother, built by a friend, just how it should be.
Friday, December 20, 2013
Every Day Carry (EDC)
I had the joy of spending my early years of life on various ranches and farms in South Dakota and Minnesota. Part of growing up was getting your first pocket knife, a monumental day that I can still remember and still have the knife. Everyone carried a knife, it was the most essential tool you could have (days before multi-tools). Folding knives were the standard and still are for the most part due to ease of use and ability to disappear when Sunday suits were worn. Then a few years back a friend and loyal KoM supporter gave me a magnificent little fixed blade knife made by Barry Dawson called an EDC. About 7.5" overall 3" blade and slim enough to fit in the leg pocket of Carhartts. All the benefits of a fixed blade yet small enough to disappear. I've skinned moose, goats, and bears with that little knife and done millions of chores with it. So this is my attempt at making a similar concept of a light, strong, small knife that you can tote along all day and not get in the way or make a big show.
I started with 1/8" thick 1095 HC steel but instead of standard heat treatment, used the Japanese method of differential heat treating and clay tempering to increase the flexibility of the thin blade while maintaining a wear resistant edge. I used the same method on my "Dakota" model but took more time etching and polishing to produce a stronger hamon (different color on the blade produced when the steel cools at two different rates simultaneously.
These blades have just been heat treated and quenched in oil. 1095 becomes non magnetic at its critical temperature (@1450 f) and then plunged into warm oil. Here you can see the hamon line where the clay covered the blade (darker) and slowed the cooling process. The blades are then tempered to relieve the stress of rapid cooling and produce the correct Rc hardness.
I temper all my blades two times at two hours each round with a cool down in between.
These blades are only hard on the bottom third toward the cutting edge.
The finished set of knives with black leather sheaths and high contrast stitching. The finished knife is about 7.5" long with a 3.5" cutting edge. The handles are G10 micarta with a slight red and black contrast and unseen in this image the handles have bright red fibre spacers between the blade and handle and brass pins. I hand finished these blades to 400 grit and etched them pretty heavily as they are working knives that should be used daily. Traditional Japanese blades with a hamon are sanded to 1000 grit and polished to a mirror finish. That's a lot of time and sanding which equates to a much higher cost with no performance gain. I'd rather have someone spend $150 on this custom knife and not feel guilty about scratching it rather than spend $1500 on a knife that never gets used. But if you want to spend $1500, I wouldn't turn it down.
 |
| Nearly finished knife with hamon line clearly visible. G10 micarta handles and brass pins. |
I started with 1/8" thick 1095 HC steel but instead of standard heat treatment, used the Japanese method of differential heat treating and clay tempering to increase the flexibility of the thin blade while maintaining a wear resistant edge. I used the same method on my "Dakota" model but took more time etching and polishing to produce a stronger hamon (different color on the blade produced when the steel cools at two different rates simultaneously.
 |
| I use high temp refractory cement as a clay coating material. Someday I'll develop my own family secret recipe as they do in Japan. |
I temper all my blades two times at two hours each round with a cool down in between.
These blades are only hard on the bottom third toward the cutting edge.
 |
| Leather work and a fine 12 year old blended refreshment. |
 |
| Leather work ready for stain and stitching for the trio. |

The finished set of knives with black leather sheaths and high contrast stitching. The finished knife is about 7.5" long with a 3.5" cutting edge. The handles are G10 micarta with a slight red and black contrast and unseen in this image the handles have bright red fibre spacers between the blade and handle and brass pins. I hand finished these blades to 400 grit and etched them pretty heavily as they are working knives that should be used daily. Traditional Japanese blades with a hamon are sanded to 1000 grit and polished to a mirror finish. That's a lot of time and sanding which equates to a much higher cost with no performance gain. I'd rather have someone spend $150 on this custom knife and not feel guilty about scratching it rather than spend $1500 on a knife that never gets used. But if you want to spend $1500, I wouldn't turn it down.
Monday, December 16, 2013
Pride
Two types of knives are produced in my little shop, things I dream up and figure out how to sell later and bespoke items that I work with clients (always referrals) to make happen. All my products are handmade by me, Malta. They start life as an idea sketched out and end up as a functional tool. This one was quite a challenge and almost didn't. But, when finally finished, it struck me, I was proud of this simple tool. Life is like that sometimes, you want to give up but keep at it and in the end it all works out. I hope the new owner enjoys his Christmas present as much as I had making it.


All my knives get custom made sheaths that are produced in house (either kydex or leather). This one is 8oz vegetable tanned cowhide from a local supplier in Anchorage. My leather comes in big odd shaped sheets and ends up like this. Some knife makers don't provide sheaths for fixed blade knives and I think that sets the wrong tone of "I don't expect you to use this pretty knife." Not here, these are not museum pieces but affordable field grade knives. The sheaths are cut, wet fit, and finished.
Final specs on this one. 1095 HC steel, 9.5" overall, 4.5" cutting edge, Cocobolo handle, stainless pins, leather sheath. I hope he likes it as much as I do, this one just fits right in the hand and is scary sharp already but could be honed even more. Thanks to Broken Tooth Brewing for tasty beer, I'm not sponsored but from one craftsman to another, well done! Now to get the other four on my bench out the door so I can start experimenting with hatchet making.
 |
| Finished with time to spare. If you know cabinets, you'll recognize the backdrop. |
 |
| Roughed out with grind lines marked |
 |
| Rough grind. The top knife is for a retired operator, the bottom is for a Vietnam Vet. |
 |
| Cleaned up after tempering |
 |
| Fresh out of heat treatment and oil quenched in my shop |
 |
| Handle blocks, Cocobolo for this one and canvas micarta for the other knife, both with .25" stainless pins |
 |
| Handle roughed out on the band saw |
 |
| Handle fitted, file work on the spine with thumb rest |


 |
| Saddle stitching and contact cement hold these together. |
 |
| Almost done, just need wax and polish. |
Final specs on this one. 1095 HC steel, 9.5" overall, 4.5" cutting edge, Cocobolo handle, stainless pins, leather sheath. I hope he likes it as much as I do, this one just fits right in the hand and is scary sharp already but could be honed even more. Thanks to Broken Tooth Brewing for tasty beer, I'm not sponsored but from one craftsman to another, well done! Now to get the other four on my bench out the door so I can start experimenting with hatchet making.
Friday, October 25, 2013
Making "Dakota"
I originally hale from South Dakota, and so do the last 8 generations of my family. My family is all still there along with many good friends. Every time I go home for a visit it takes me a couple days to get used to how nice people are and the sense of community that exists in their actions. A month ago a huge unseasonal storm hit and devastated the ranchers that eek out that tough living on the plains. One ranch that got hit hard is owned by a man I do a bit of business with and also share some mutual friends. In typical Dakota fashion he asked for a simple favor, he needed to know how much business he could count on before buying some needed equipment. No, not donations, or handouts, he asked for more work. That says a lot about the character of man and reminds me of my grandparents that survived those lean years of the dust bowl.
My idea was to give Jay of V Lazy J Custom Leather more work to do (he asked for it) by making him a knife and he could make the sheath and auction the rig off to raise some funds for his herd. I don't make tactical knives as that's not my world but wanted to give it a try with a heavy piece of 1075 I had in the shop. I had the supplies and just had to throw the effort in to get this rolling.
 My inspiration was the Tom Brown Tracker, but with some modifications and personal preferences. Here is my initial sketch up pad where all my ideas start out. you can see the erased lines where I changed the design around. I then make a paper template and transfer it to the steel. This piece of steel is 1075 HC that is 1/4" thick and 2" tall.
 Here is the blank after it is flattened, cut out and cleaned up. I start with a portable bandsaw for the rough outline, then a big bench grinder to shape it more. I finish with a couple different belt and drum sanders to finalize the shape.


On the left you can see the outline for the grind lines and the finished product on the right. Again grinder, belt sander, then files and sand paper to get the grind bevel correct.
 This beast was first normalized in my kiln to reduce the stress of grinding and shaping the steel. Then it got a light coat of clay to keep the de carbing in check and then a heavier layer. This is Japanese style differential heat treating. It allows the steel to cool at two different rates simultaneously. So the edge is hardened but the spine remains slightly softer to allow for some flexing and reduce the chance of a complete failure under stress.
I added some heavy texture to the micarta handles to aid in grip and three tubes to allow the owner to place a lanyard where needed. As this knife is a heavy work grade tool (matte etched finish) I wanted to make sure it worked before leaving the shop. My test was this, it had to shave then chop a 2x4 completely in half across the grain and still shave. Yup, it passed and I have the bald spot to prove it.
 Here it is all cleaned up and ready to ship to South Dakota. Now for my selfish part, I haven't seen Jay make a sheath yet so now he has to and then I can bug him to make my clients really cool matching rigs.
Lacking much creativity this week I dubbed it the "Dakota". Not fancy but tough as nails and designed to get the job done with no excuses. Yup sounds about right. I might make a lighter version this spring if there is interest....
This will be up for auction through V Lazy J Custom--find them on Facebook. Great leather work and world class customer service! He even makes old school rigs for wheel gunners like me.
My idea was to give Jay of V Lazy J Custom Leather more work to do (he asked for it) by making him a knife and he could make the sheath and auction the rig off to raise some funds for his herd. I don't make tactical knives as that's not my world but wanted to give it a try with a heavy piece of 1075 I had in the shop. I had the supplies and just had to throw the effort in to get this rolling.


On the left you can see the outline for the grind lines and the finished product on the right. Again grinder, belt sander, then files and sand paper to get the grind bevel correct.

 |
| Specs: 9.75" Long 4.5" cutting edge, 2" tall at the widest, 1/4" thick and weighs 13.2 oz |

Lacking much creativity this week I dubbed it the "Dakota". Not fancy but tough as nails and designed to get the job done with no excuses. Yup sounds about right. I might make a lighter version this spring if there is interest....
This will be up for auction through V Lazy J Custom--find them on Facebook. Great leather work and world class customer service! He even makes old school rigs for wheel gunners like me.
Tuesday, October 22, 2013
Handmade Bench Chisels
I enjoy dabbling in wood working because this allows me to justify owning more tools and making a mess. The essential tool of any woodworker has to be chisels. Which seems odd as many youngsters don't know how to use them and have never owned one of any quality. Most commercial chisels sold today are garbage, a waste of precious resources. I wanted a fine set for my shop but realized I couldn't afford to buy a hand crafted set. So why not make one? I decided on bench chisels with a 6" blade with a 5" handle, 01 tool steel from New Jersey Steel Baron and basic sizes of 1/4", 1/2", 3/4", 1" and 2" (this one is 1075). As with most things in life I don't let a lack of knowledge stop my endeavors, learn by trying. Everything but making the dowels was done in my shop including heat treating of the steel.
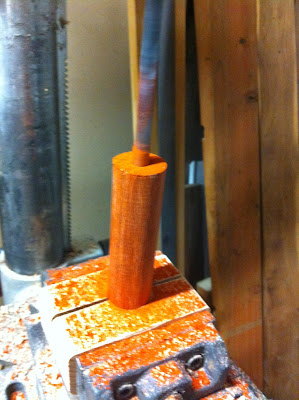 The handles caused me a lot of grief in the planning phase as I don't own a lathe. My solution was to go with Japanese style handles with copper ferrules. Bell Forest Products sells exotic hardwood dowels, so round wasn't an issue. I cut them to the length I needed then made a jig for my drill press. This is easy by drilling a hole in a 2x4 scrap and then cutting it in half with a pull saw. The kerf allows me to clamp the dowel on my drill press and make a hole for the tang.
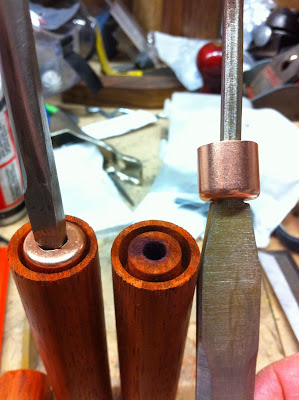 How to make a ferrule? I looked high and low and could only find one offering from Lee Valley Tools, but the shipping was outrageous to Alaska (as usual) so plan b. I discovered that 1/2" copper pipe caps have exactly 5/8" opening which is a size of plug cutter I own already. Used my dowel jig again and the plug cutter to form the piece that will fit inside the ferrule.
 I removed the excess wood on the bandsaw by setting the fence up and rolling them trough the cut. I used a belt sander and some steady hands to shape the bottom of the handle into a slight taper down to the ferrule and also round the top off. The handles are affixed with epoxy, sanded to 400 grit and then given two coats of boiled linseed oil and a top coating of wax.
 |
| Basic shapes cut out of bar stock 2" is .25" thick the rest are .187" |
 |
| Rough profiles ground and tangs rounded |


 |
| Excess wood removed and ferrules fit |
 I removed the excess wood on the bandsaw by setting the fence up and rolling them trough the cut. I used a belt sander and some steady hands to shape the bottom of the handle into a slight taper down to the ferrule and also round the top off. The handles are affixed with epoxy, sanded to 400 grit and then given two coats of boiled linseed oil and a top coating of wax.
The pattern on the blades was from the clay coating placed on the steel for heat treating to keep the steel from de-carbing. I liked it so didn't clean them up except for the cutting edges that are polished.
As with any first time project I learned a lot and this won't be the last set I ever make. Now I have my own set of pretty chisels!
Friday, October 11, 2013
Gentlemanly Pursuits
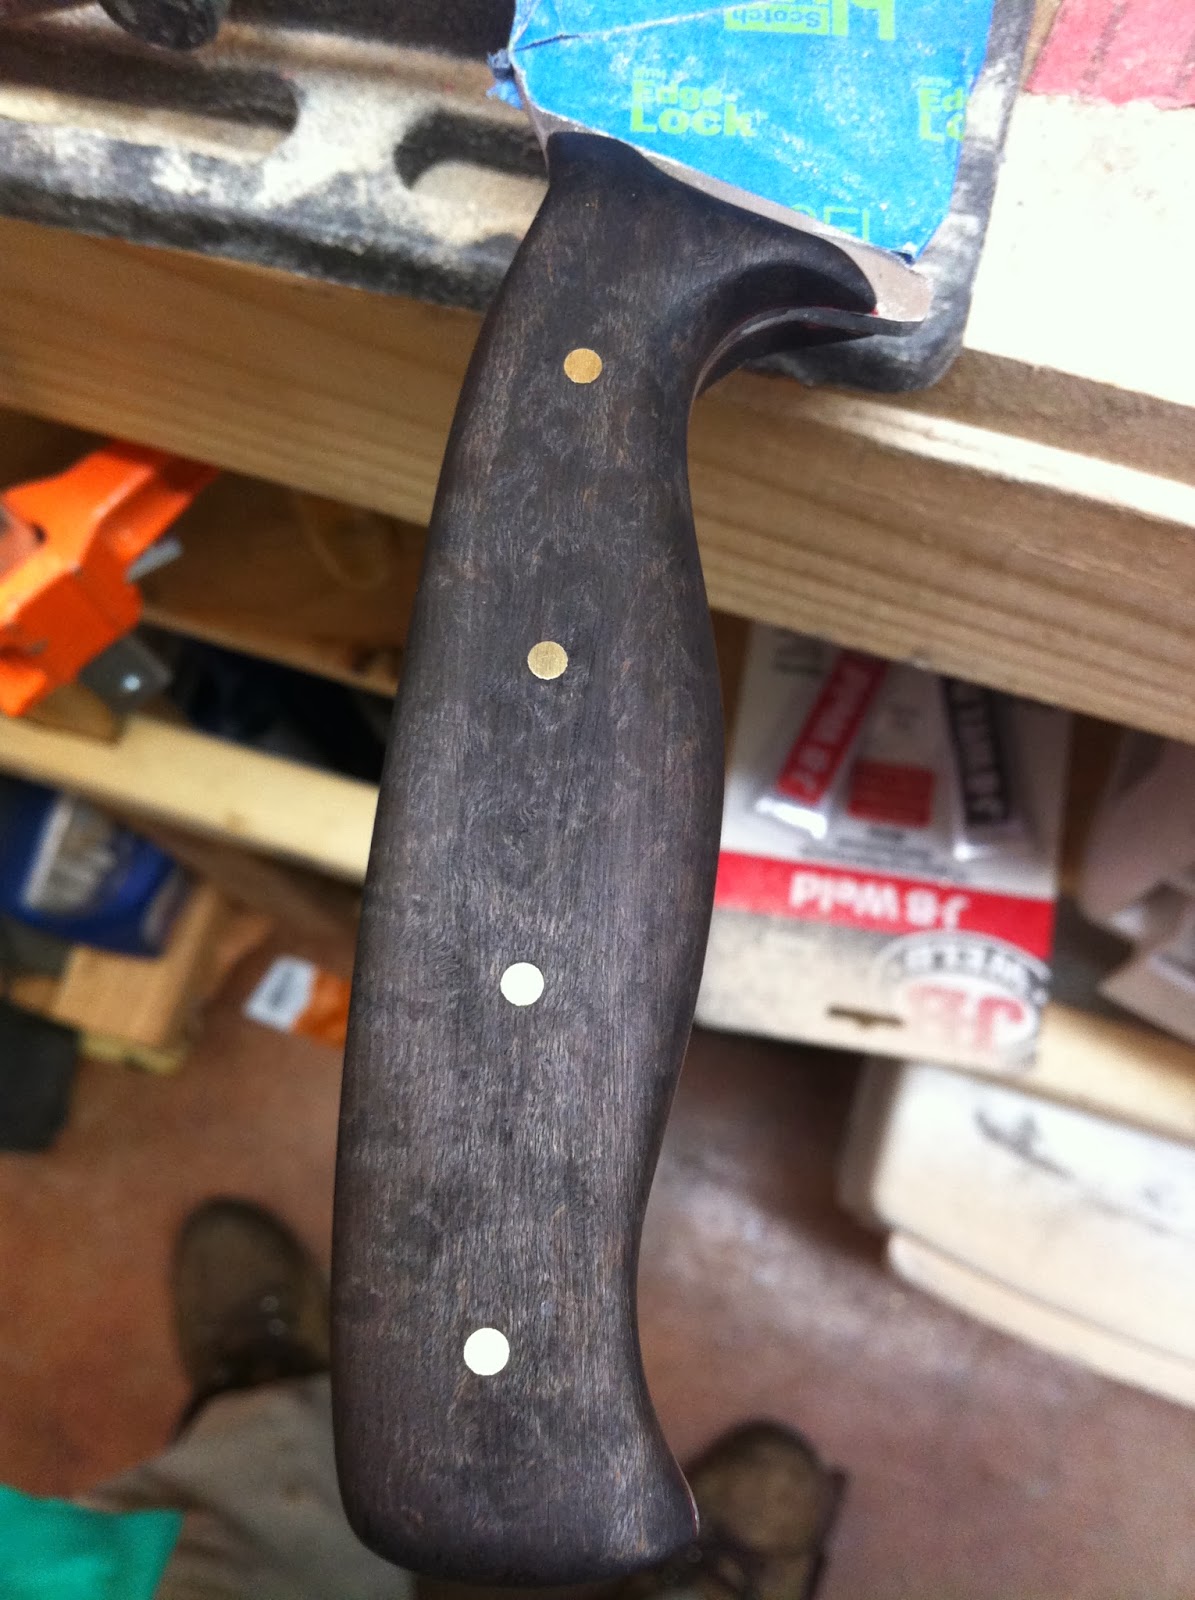
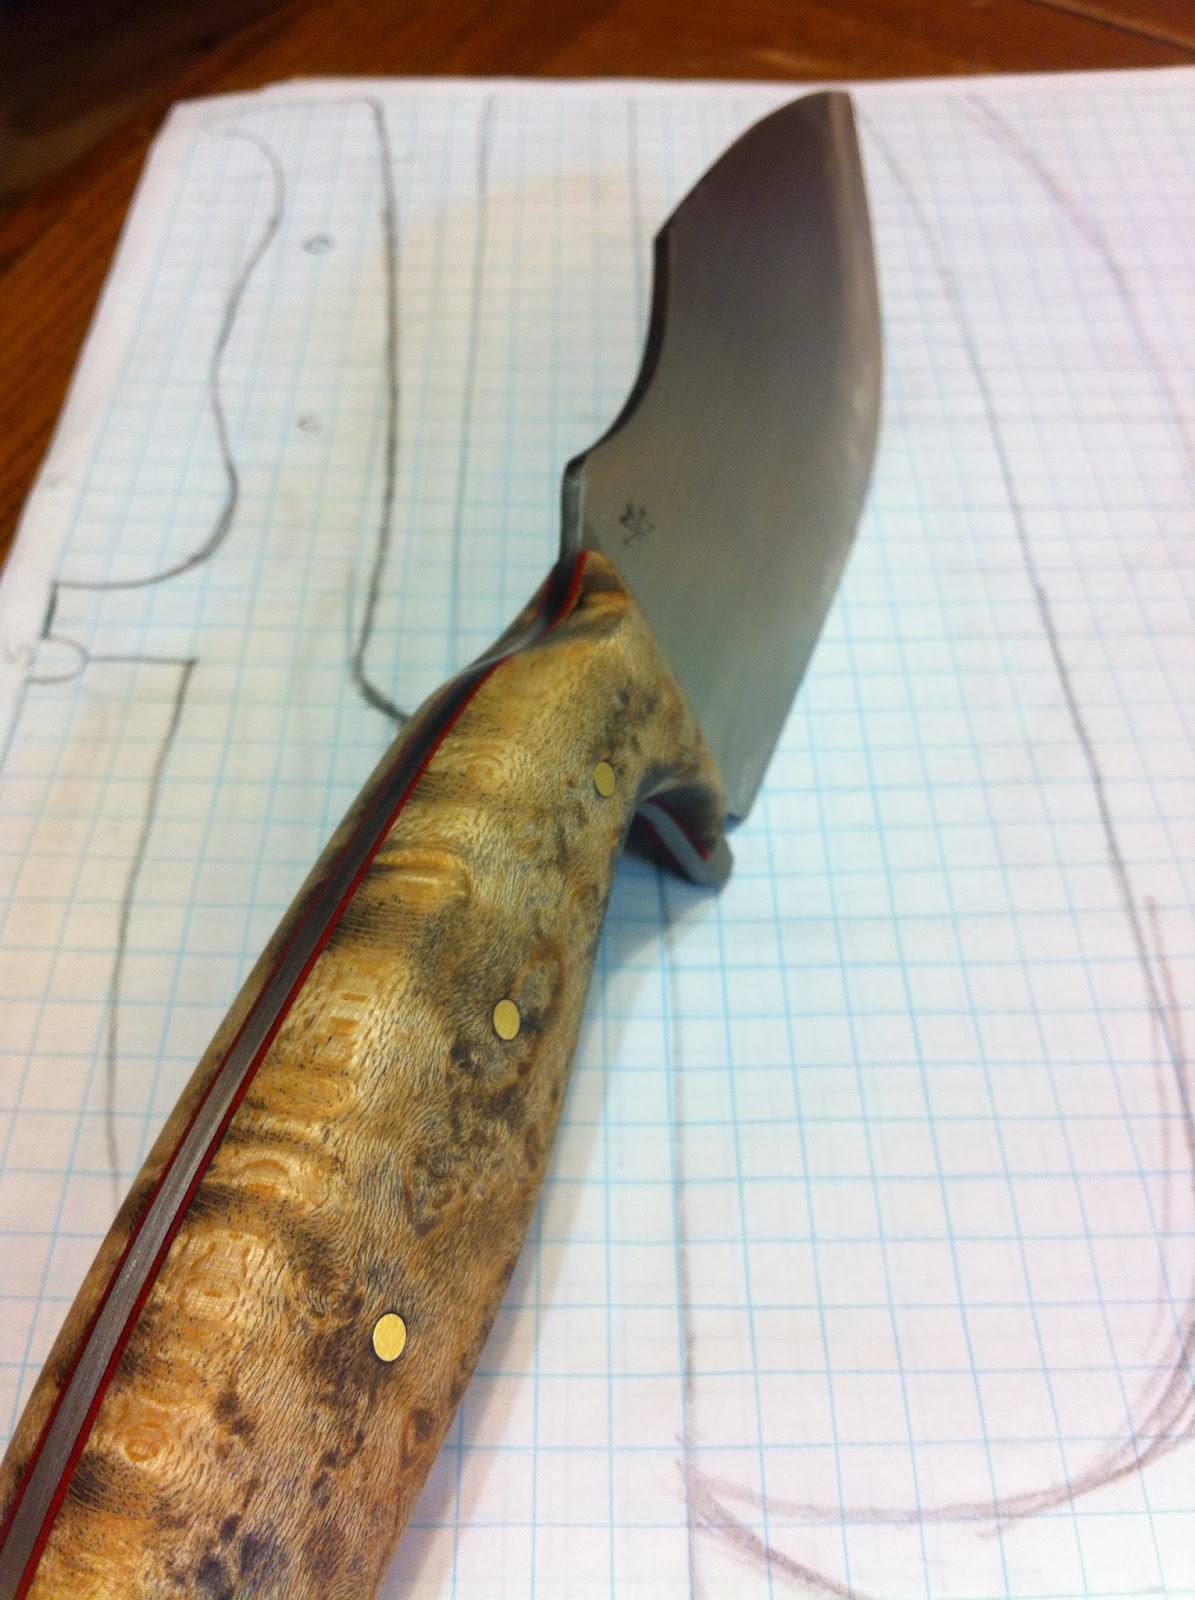
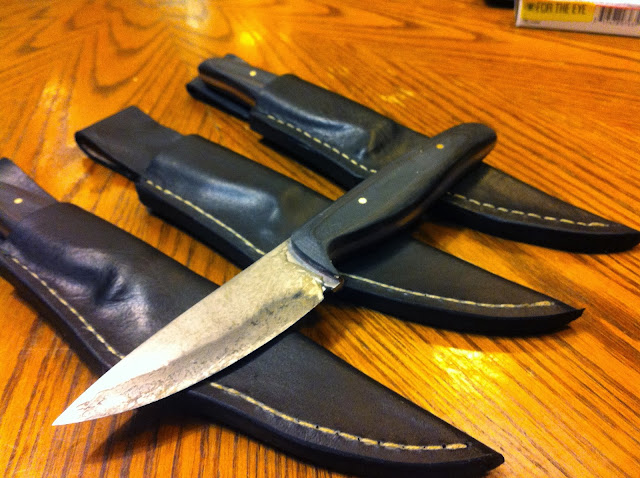
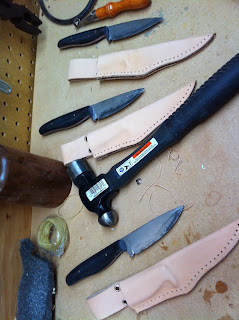
This is part one of an idea I started a year ago and am just wrapping up part one. I enjoy outdoor pursuits of almost every kind and like most outdoors people I long for those days when hunting required tweed vests and fishing was done with bamboo flyrods. It seemed each item was crafted by an expert and it was just as much fun to maintain your gear as it was to use it. Oh, yes I'm nostalgic for a time I never lived, the days of WDM Bell and Jim Corbett. Which brings me to the idea of a gentlemen's combination for the field; a matched set of bird and trout knives and tobacco pipes. I've always enjoyed upland bird hunting, it is a great way to spend a day. You can talk while working a field and catch up with friends while pursuing game over a fine hound. It's not about tromping mountains or carrying giant packs through swamps, its a relaxing pursuit and the tools should reflect this effort. They should be crafted to the task and be of the finest quality.
I did everything on these knives in house. I cut and ground the blades by hand, heat treated in my kiln. The olive wood was cut from larger block and hand fit and finished to each knife. The sheaths were made from a piece of vegetable tanned leather, just a big piece of cowhide. In these days when many "custom" gun and knife makers are nothing more than assembly men for factory made parts I think it is important to be truthful of who makes what. These are all mine, even the minor flaws that no one but me will ever see.
Now it is on to making the matching pipes to complete these sets. It just so happens my oldest friend ordered this set, now we just have to make time to pursue birds together again.
 |
| The shorter three are the bird and trout knives. 3/16" 01 tool steel, all being fit with brass bolsters and choice wood. The longer blade is for a Major sorting out some nefarious fellows abroad. |
 |
| Etched blades and olive wood handles |
 |
| Fitting and roughing out handle blocks |
 |
| Wet fit 8oz leather belt sheaths |
I did everything on these knives in house. I cut and ground the blades by hand, heat treated in my kiln. The olive wood was cut from larger block and hand fit and finished to each knife. The sheaths were made from a piece of vegetable tanned leather, just a big piece of cowhide. In these days when many "custom" gun and knife makers are nothing more than assembly men for factory made parts I think it is important to be truthful of who makes what. These are all mine, even the minor flaws that no one but me will ever see.
Now it is on to making the matching pipes to complete these sets. It just so happens my oldest friend ordered this set, now we just have to make time to pursue birds together again.
 |
| Finished, 6 coats of tung oil on the handles to build up depth and a wax finish over the top. Double etched blades to create a pattern on the steel. 8.5" overall with a 3.5" cutting edge. The leather is finished in oil and wax as well. I despise tools that are hard to maintain, a little regular maintenance will keep this set going for a couple generations. |
Subscribe to:
Posts (Atom)